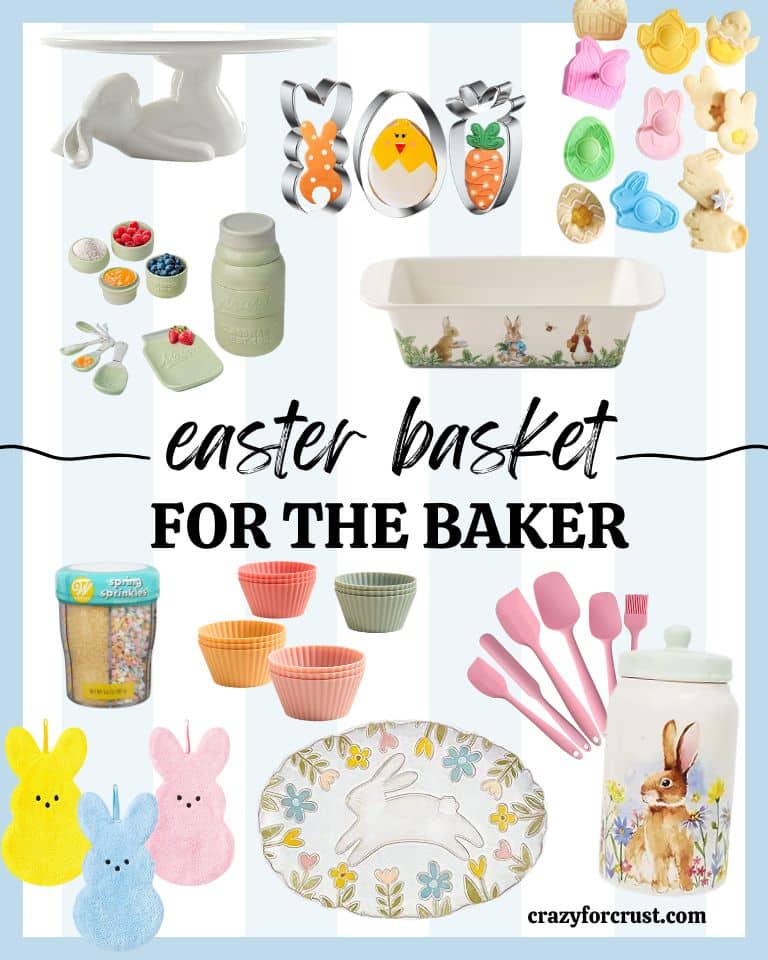
Sweet Easter Treats for Bakers
Easy Easter Baskets You Can Make in 30 Minutes (No Baking Required!)
Looking for a festive, no-fuss treat that’ll wow the kids—and your Easter brunch guests? These adorable Easter baskets are as simple as they are charming. Made with just a handful of pantry staples and ready in half an hour, they’re the perfect blend of sweet, crunchy, and celebratory. Plus, they double as edible centerpieces!
What Is This Easter Baskets Recipe?
This isn’t your grandma’s basket—it’s a playful, edible version made entirely from store-bought ingredients you probably already have. Think crispy chow mein noodles molded into little nests, filled with pastel-colored candy-coated chocolates or mini jelly beans, and tied with a ribbon (optional but so cute). It’s more craft than cook, which means even little hands can help assemble them. The result? A whimsical, shareable treat that captures the joy of the season without turning your kitchen into a mess. Best of all, there’s no oven, no melting, and no complicated steps—just mix, shape, and fill.
Enjoying this article?
Subscribe and never miss an update.
We respect your privacy. Unsubscribe at any time.
Why You’ll Love This Recipe
Let’s be real: holiday prep is stressful enough. These Easter baskets cut through the chaos with their simplicity. They’re naturally gluten-free if you use certified GF chow mein noodles (yes, they exist!), and you can easily swap in dairy-free candies for anyone with allergies. I’ve made these for classroom parties, church gatherings, and even as hostess gifts—every time, people ask for the “recipe,” and I love watching their faces light up when I say, “It’s just three things!”
Another win? They hold up beautifully. Unlike delicate pastries or frosted cookies, these won’t crumble or melt if left out for a few hours. That makes them ideal for Easter egg hunts or buffet tables where treats sit out awhile. And because they’re individually portioned, there’s no fighting over who gets the biggest slice. My secret touch? A tiny pinch of sea salt sprinkled over the candy before serving—it balances the sweetness and makes each bite pop.
How to Make Easter Baskets
Quick Overview
This recipe makes 6 individual baskets and takes about 25 minutes from start to finish. You’ll lightly toast chow mein noodles for extra crunch, press them into muffin tins to form nest shapes, let them cool, then fill with your favorite Easter candies. No special tools needed—just a skillet, spoon, and standard muffin tin.
Ingredients
You’ll need:
- 2 cups chow mein noodles (about one small can)
- 2 tablespoons unsalted butter
- 1/4 teaspoon vanilla extract
- 1 1/2 cups pastel Easter candies (like M&M’s, jelly beans, or mini chocolate eggs)
- Optional: ribbon or twine for garnish
Step-by-Step Instructions
In a large skillet over medium-low heat, melt the butter. Stir in the vanilla, then add the chow mein noodles. Gently toss for 2–3 minutes until lightly golden and fragrant—watch closely, as they can burn quickly. Remove from heat and let cool for 2 minutes. Lightly grease a 6-cup muffin tin, then press about 1/3 cup of warm noodles into each cup, shaping them up the sides like little bowls. Let cool completely (about 10 minutes) until firm. Carefully pop out each basket and fill with candies. Tie with ribbon if desired.
What to Serve It With
These baskets shine on their own, but pair them with a light spring salad, deviled eggs, or a mimosa bar for a complete Easter brunch. They also make sweet additions to dessert platters alongside lemon bars or Carrot Cake Cupcakes. For a non-alcoholic option, serve with sparkling apple cider in mini pitchers.
Top Tips for Perfecting Your Easter Baskets
Don’t skip the toasting step—it deepens the flavor and adds crucial crispness. If your noodles seem too loose to hold shape, let the mixture cool a bit longer before pressing; warmth helps them bind. For a fun twist, mix in a handful of crushed pretzel bits with the noodles for a sweet-salty kick. And here’s my unique tip: lightly spray the inside of your muffin tin with nonstick cooking spray instead of greasing—it creates a smoother edge and makes removal effortless.
Storing and Reheating Tips
Store Easter baskets in an airtight container at room temperature for up to 5 days. They don’t need refrigeration and actually taste better after sitting a day (the noodles soften just slightly, making them easier to bite). If they lose crispness, pop them in a 250°F oven for 3–4 minutes to refresh—but honestly, they’re best enjoyed within the first couple of days when the texture is ideal.
Frequently Asked Questions
Final Thoughts
These Easter baskets are more than just a treat—they’re a moment of joy wrapped in crunch and color. Whether you’re hiding them in the garden for a hunt or setting them out on the brunch table, they bring a smile every time. And honestly? Once you try making them, you’ll wonder why you ever bought those flimsy paper ones. Happy Easter, friend—may your baskets be full and your heart even fuller.
Sweet Easter Treats for Bakers
Ingredients
Method
- In a medium bowl, whisk together flour, baking powder, and salt. Set aside.
- In a large bowl, beat softened butter and granulated sugar with an electric mixer until light and fluffy, about 3 minutes.
- Beat in the egg and vanilla extract until fully combined.
- Gradually add the dry ingredients to the wet ingredients, mixing on low speed until a soft dough forms.
- Divide the dough in half, shape into discs, wrap in plastic wrap, and chill for at least 1 hour.
- Preheat oven to 350°F (175°C). Line baking sheets with parchment paper.
- Roll out dough on a lightly floured surface to 0.25-inch thickness. Cut into Easter shapes using cookie cutters (bunnies, eggs, chicks).
- Place cookies 1 inch apart on prepared baking sheets. Bake for 10–12 minutes, or until edges are lightly golden.
- Let cookies cool on the baking sheet for 5 minutes, then transfer to a wire rack to cool completely.
- For the frosting, beat softened butter until creamy. Gradually add powdered sugar, vanilla, and milk. Beat until smooth and fluffy.
- Divide frosting into small bowls and tint each with a different pastel food coloring.
- Frost cooled cookies and decorate with sprinkles. Let frosting set before serving.


These Easter baskets look so cute and easy to make! I love how kid-friendly and festive they are—perfect for a quick treat.
These look so cute and easy to make! I love how kid-friendly they are—perfect for a busy weekend.
These Easter baskets look so fun and easy to make—perfect for keeping the kids busy while still looking cute! Love that you don’t need to bake.
Ooh these look so cute and perfect for Easter! Definitely adding this to my list.
Love this idea—so quick and adorable! My kids would be thrilled. Perfect for a last-minute Easter treat.