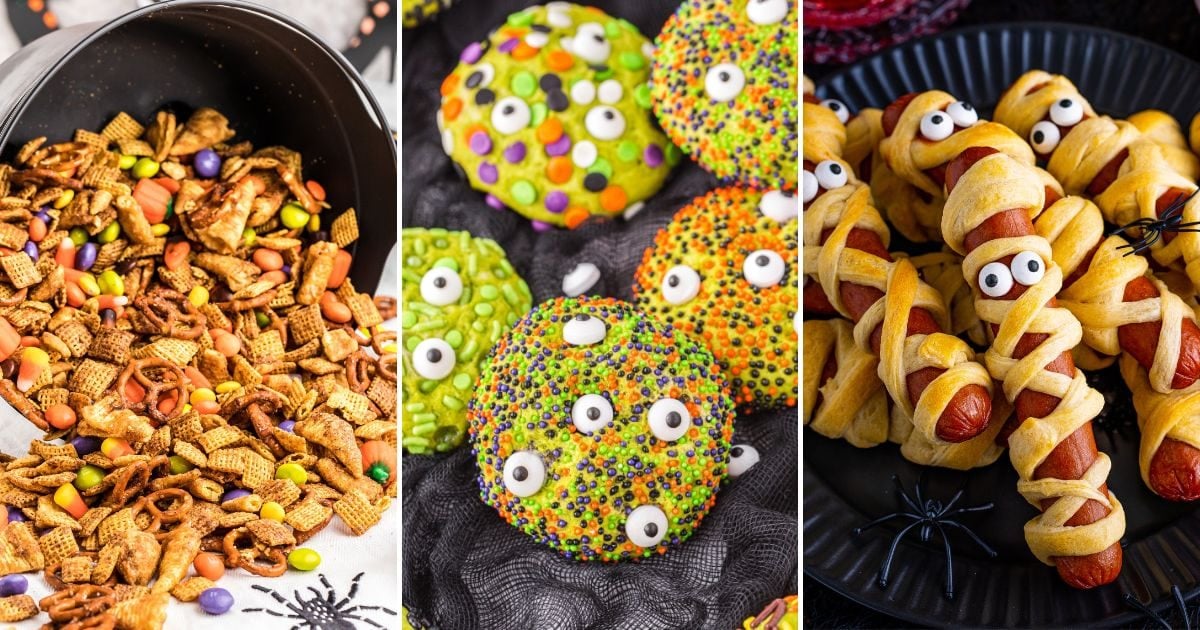
Spooktacular Halloween Treats You’ll Love
Spooky-Sweet Halloween Treats That’ll Win Over Every Ghost and Goblin
You know that feeling when the air gets crisp, the leaves start crunching underfoot, and suddenly your kitchen just *demands* to be filled with something festive? That’s me right now—standing in my cozy little pantry, eyeing my stash of cocoa powder and marshmallows like they’re secret ingredients for magic. And honestly? They kind of are. This year, I decided to whip up some homemade Halloween treats that are equal parts adorable, delicious, and ridiculously easy to make. No fancy piping bags, no temperamental chocolate work—just simple, joyful baking that even your littlest trick-or-treaters can help with. Whether you’re hosting a spooky soirée, sending goodie bags to school, or just craving something sweet with a side of whimsy, these treats hit all the right notes. Plus, they look like they belong in a Halloween movie—but taste like pure comfort. So grab your favorite apron (maybe one with a black cat on it?), and let’s turn your kitchen into a cauldron of cozy autumn joy.
What Is This Halloween Treat?
This recipe is for my go-to Halloween Monster Eye Brownies—fudgy, rich chocolate brownies topped with creamy vanilla frosting and decorated with edible “eyes” made from white chocolate chips and mini M&Ms. They’re playful without being scary, sweet without being cloying, and honestly, they disappear faster than candy on October 31st. I’ve been making a version of these for years, ever since my niece begged me to bring something “spooky but not gross” to her class party. What started as a last-minute idea has become a family tradition—and now, I’m sharing it with you. These aren’t just desserts; they’re little edible works of art that bring smiles (and maybe a few giggles) to both kids and grown-ups. The best part? You don’t need to be a pro baker to pull them off. Just a love for chocolate, a pinch of creativity, and maybe a playlist full of Halloween classics while you bake.
Enjoying this article?
Subscribe and never miss an update.
We respect your privacy. Unsubscribe at any time.
Why You’ll Love This Recipe
Let’s be real—Halloween treats often fall into one of two camps: either overly complicated (looking at you, fondant-covered cupcakes) or just store-bought candy dumped into a bowl. These Monster Eye Brownies? They strike the perfect balance. First off, they’re ridiculously easy. The brownie base uses pantry staples—no special equipment, no hard-to-find ingredients. Just melt, mix, bake, and frost. Second, they’re customizable! Swap the M&Ms for candy corn, use black icing for spiderweb designs, or add orange sprinkles for a pop of autumn color. Third—and this is huge—they actually taste amazing. Not “just for looks” good, but genuinely rich, moist, and chocolatey. My husband, who usually rolls his eyes at “theme food,” asked if we could make these year-round (I said yes, but only if he helps decorate). Plus, they’re a total crowd-pleaser at parties, school events, or even as a fun weekend project with the kids. There’s something so satisfying about watching someone take a bite and their face light up—especially when they realize the “eye” is just sweet, melty chocolate. It’s Halloween magic, baked right into every square.
How to Make Halloween Monster Eye Brownies
Quick Overview
These brownies come together in under an hour, including baking and decorating time. You’ll start with a classic fudgy brownie base (made with melted butter, sugar, eggs, cocoa powder, and a touch of vanilla), bake it until perfectly set, then let it cool completely before frosting. Once frosted, it’s time for the fun part: adding the monster eyes! Simply press white chocolate chips into the frosting and top each with a mini M&M for the iris. That’s it! No piping, no food coloring disasters—just simple, spooky-cute decoration. Pro tip: Let the brownies cool fully before frosting, or your icing will melt and your eyes will slide right off. Trust me, I’ve learned that the hard way.
Ingredients
For the brownies: 1/2 cup (1 stick) unsalted butter, 1 cup granulated sugar, 2 large eggs, 1 teaspoon vanilla extract, 1/3 cup unsweetened cocoa powder, 1/2 cup all-purpose flour, 1/4 teaspoon salt, 1/4 teaspoon baking powder. For the frosting: 1/2 cup (1 stick) unsalted butter, softened, 2 cups powdered sugar, 1–2 tablespoons milk, 1 teaspoon vanilla extract. For decorating: 24–30 white chocolate chips, 24–30 mini M&Ms (any color—red, green, or brown work great for “spooky” eyes).
Step-by-Step Instructions
Preheat your oven to 350°F (175°C) and line an 8×8-inch baking pan with parchment paper, leaving an overhang for easy removal. In a medium saucepan, melt the butter over low heat. Remove from heat and stir in sugar until combined. Let cool for 5 minutes, then whisk in eggs one at a time, followed by vanilla. Sift in cocoa powder, flour, salt, and baking powder, and stir until just combined—don’t overmix! Pour batter into the prepared pan and bake for 20–25 minutes, or until a toothpick inserted in the center comes out with a few moist crumbs. Let cool completely in the pan. While the brownies cool, make the frosting: beat softened butter until creamy, then gradually add powdered sugar, vanilla, and milk until smooth and spreadable. Frost the cooled brownies evenly. Finally, press a white Chocolate Chip into the center of each brownie square, then gently press a mini M&M on top to create the iris. Serve immediately or store covered.
What to Serve It With
These Monster Eye Brownies are stars on their own, but if you’re hosting a Halloween bash, pair them with a big bowl of popcorn (spooky season isn’t complete without it!), some apple cider (warm or cold—your call), or even a platter of caramel-dipped pretzel rods. For a full dessert table, add a few orange and black cupcakes, some chocolate-dipped strawberries, or a simple cookie platter with ghost-shaped shortbread. And hey—if you’ve got leftovers (unlikely, but hey, miracles happen), they make the perfect after-school snack or midnight treat when you’re rewatching Hocus Pocus for the tenth time this month.
Top Tips for Perfecting Your Halloween Treats
First, don’t skip the cooling step! Warm brownies + frosting = sad, melty eyes. Second, use room-temperature eggs and butter—they blend more smoothly and give you that perfect fudgy texture. Third, if your frosting feels too thick, add milk one teaspoon at a time. Too thin? A little more powdered sugar will fix it. Fourth, get creative with the eyes: try different colored M&Ms for varied “personalities,” or use black icing to draw pupils if you’re feeling artsy. And finally—invite the kids! Let them place the eyes. Their monster creations will be uniquely chaotic (and absolutely adorable). Oh, and one last thing: don’t worry if they’re not perfect. The charm is in the imperfection—just like Halloween itself.
Storing and Reheating Tips
Store your Halloween treats in an airtight container at room temperature for up to 3 days, or in the fridge for up to a week (though I doubt they’ll last that long!). If they’ve been chilled, let them sit out for 15–20 minutes before serving so the frosting softens slightly. You can also freeze unfrosted brownies for up to 2 months—just thaw overnight in the fridge, frost, and decorate when ready. As for reheating? A quick 10-second zap in the microwave per square brings back that fresh-baked warmth, but honestly, these are just as delicious at room temp. No need to overcomplicate it!
Frequently Asked Questions
Final Thoughts
Baking these Halloween treats reminded me why I fell in love with the kitchen in the first place—it’s not just about the food, but the joy, the memories, the little moments of connection. Whether you’re sharing them with friends, family, or just treating yourself after a long day, these Monster Eye Brownies are more than dessert. They’re a celebration of autumn, of playfulness, of the magic that happens when we slow down and make something with love. So this Halloween, skip the store-bought candy haul and whip up a batch of these instead. Your taste buds (and your inner child) will thank you. Happy haunting—and happy baking!
Spooktacular Halloween Treats You'll Love
Ingredients
Method
- Line a baking sheet with parchment paper and set aside.
- Melt white chocolate chips in a microwave-safe bowl in 30-second intervals, stirring between each, until smooth. Add vegetable oil if needed to thin.
- Dip each chocolate sandwich cookie halfway into the melted white chocolate, then place on the prepared baking sheet. Immediately press 2 mini marshmallows onto the chocolate-covered side to form 'eyes'.
- Melt green candy melts and use a toothpick to dot small circles on the marshmallows for zombie pupils. Let set for 5 minutes.
- Use edible black decorating gel to draw spooky faces—add stitches, smiles, or fangs for extra Halloween flair.
- Allow treats to fully harden at room temperature or in the refrigerator for 10 minutes before serving.


Ooh, I love these spooky ideas—especially the glowing jack-o’-lantern cupcakes! Perfect for Halloween without being too messy. 😊
Ooh, I love this—especially the part about the kitchen “demanding” treats! Perfect timing for some Halloween fun.
Ooooh, love this—especially the part about the kitchen *demanding* treats! I’m already plotting my next spooky bake. 😈
Ooh, these look so fun and easy to make—perfect for trick-or-treaters! Can’t wait to try the ghost cupcakes this year!
Ooh, love this—especially the part about kitchen magic kicking in with fall vibes. Can’t wait to try those spooky treats! 🍂