Simple Caramel Pie Recipe
Easy No-Bake Banoffee Pie That Sets Perfectly Every Time
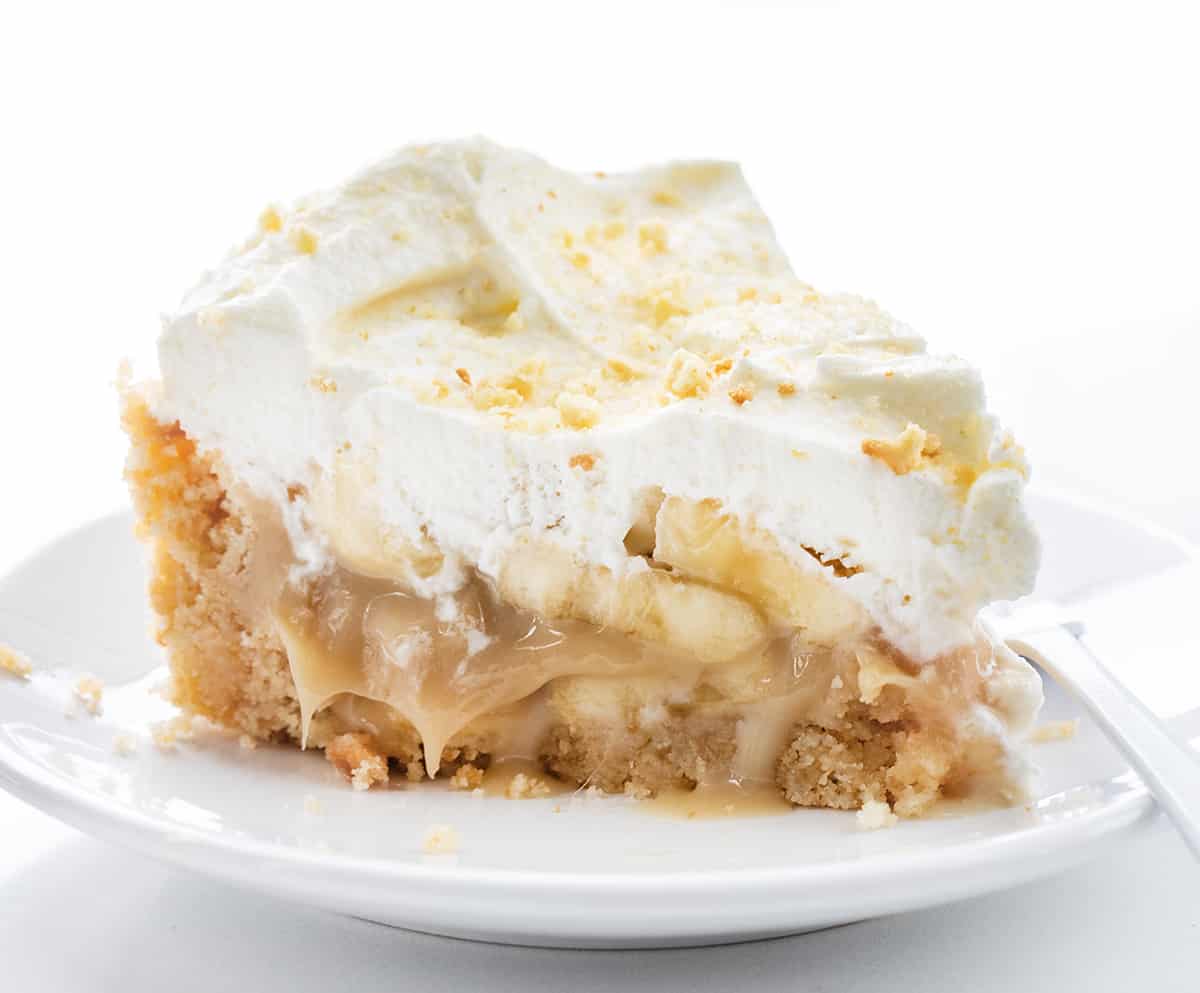
If you’ve ever fallen for the caramelized sweetness of bananas meeting rich toffee in a buttery biscuit base, then this no-bake banoffee pie is your new dessert soulmate. It’s ridiculously simple, doesn’t require an oven, and sets up beautifully in the fridge—making it ideal for dinner parties or when you just need a little comfort in slice form. Plus, it uses pantry staples you likely already have on hand.
What Is Banoffee Pie?
Banoffee pie is a British classic that started life in the 1970s at a Sussex pub called the Hungry Monk. The name is a mashup of “banana” and “toffee,” which tells you almost everything you need to know. It’s a no-bake dessert built on a crisp digestive biscuit crust, layered with homemade or store-bought dulce de leche (that luscious caramel-like sauce), sliced ripe bananas, and finished with a generous swoop of whipped cream. Unlike many pies, it doesn’t involve pastry baking or custard cooking—just assembly and chilling. What makes it special isn’t just the flavor combo (though that’s divine), but how the textures play together: crunchy base, velvety toffee, soft banana, and cloud-like cream. It’s indulgent without being fussy, and honestly? Once you try it, you’ll wonder why you didn’t make it sooner.
Enjoying this article?
Subscribe and never miss an update.
We respect your privacy. Unsubscribe at any time.
Why You’ll Love This Recipe
This banoffee pie strikes the perfect balance between decadent and doable. You don’t need fancy equipment or hard-to-find ingredients—just a mixing bowl, a whisk, and about 20 minutes of active time. The crust comes together in minutes using crushed digestives and melted butter (no food processor needed if you’re lazy like me—just pop them in a zip-top bag and whack with a rolling pin). The toffee layer can be homemade dulce de leche (just simmer sweetened condensed milk in a sealed can for 2 hours) or store-bought—I won’t judge. Ripe but firm bananas hold their shape without turning mushy, and the whipped cream adds just enough lightness so it never feels heavy. It’s also incredibly forgiving: if your crust cracks a little during pressing, just patch it with your fingers. And because it chills instead of bakes, it’s perfect for hot days or when your oven’s already occupied. Plus, it feeds a crowd—one pie easily serves eight, and leftovers (if any!) taste even better the next day as the flavors meld.
How to Make Banoffee Pie
Quick Overview
This no-bake banoffee pie takes under 30 minutes to assemble and needs at least 4 hours (or overnight) to set in the fridge. No oven, no stovetop cooking beyond melting butter—just layer, chill, and enjoy. It’s ideal for beginners or anyone short on time but craving something impressive.
Ingredients
For the crust:
– 200g (about 16) digestive biscuits (or graham crackers)
– 100g unsalted butter, melted
For the filling:
– 1 x 397g can dulce de leche (or homemade)
– 3 medium bananas, peeled and sliced into ½ cm rounds
For the topping:
– 300ml double cream (heavy cream)
– 1 tbsp icing sugar (powdered sugar)
– ½ tsp vanilla extract
Optional garnish:
– Dark Chocolate shavings or cocoa powder
Step-by-Step Instructions
Crush the digestives into fine crumbs—either in a food processor or by placing them in a sturdy zip-top bag and crushing with a rolling pin. Stir in the melted butter until the mixture resembles wet sand. Press firmly into the bottom and slightly up the sides of a 20–23cm (8–9 inch) springform or loose-bottomed tart tin. Use the back of a spoon or a flat-bottomed glass to compact it evenly. Chill while you prep the rest.
Spread the dulce de leche evenly over the chilled crust—it should be thick but spreadable; warm it slightly if too stiff. Arrange the banana slices in a single layer over the toffee, slightly overlapping if needed.
In a large bowl, whip the cream with icing sugar and vanilla until soft peaks form. Spread gently over the bananas, covering completely. Refrigerate for at least 4 hours, preferably overnight, to let the layers settle and firm up.
Before serving, run a knife around the edge, release the tin, and slice. For a finishing touch, scatter with chocolate shavings or dust with cocoa.
What to Serve It With
This banoffee pie shines on its own, but if you’re serving it after a hearty meal, pair it with a scoop of vanilla Ice Cream or a drizzle of extra dulce de leche. It also pairs beautifully with a cup of strong black coffee or a glass of cold milk—classic comfort combos. For a dinner party, serve slices on small plates with a sprig of mint for a pop of color.
Top Tips for Perfecting Your Banoffee Pie
Use bananas that are yellow with just a few brown speckles—they’ll be sweet but firm enough to hold their shape. Overripe bananas turn to mush and make the filling watery. Press the crust down firmly; a loose base will crumble when slicing. And here’s my unique tip: lightly brush the banana slices with lemon juice before layering. It prevents browning and adds a subtle brightness that cuts through the richness. For a boozy twist, stir 1–2 tbsp of dark rum or coffee liqueur into the dulce de leche—it deepens the flavor without overpowering it.
Storing and Reheating Tips
Store leftover banoffee pie covered in the fridge for up to 3 days. It doesn’t freeze well—the cream and bananas don’t defrost gracefully—so enjoy it fresh. Never leave it at room temperature for more than 2 hours, especially in warm weather. To serve cold slices cleanly, dip your knife in hot water and wipe dry between cuts.
Frequently Asked Questions
Final Thoughts
There’s something deeply satisfying about a dessert that feels both luxurious and effortless—and this banoffee pie nails it. It’s the kind of recipe you’ll keep in your back pocket for birthdays, potlucks, or just because Tuesday deserves something sweet. The combination of textures, the nostalgic familiarity, and the fact that it sets up while you nap? Total win. Give it a try, and I promise you’ll be slicing into that creamy, caramel-kissed slice before you know it.
Simple Caramel Pie Recipe
Ingredients
Method
- Preheat oven to 350°F (175°C).
- In a medium bowl, mix graham cracker crumbs, sugar, and melted butter until well combined.
- Press the mixture firmly into the bottom and up the sides of a 9-inch pie dish.
- Bake the crust for 8 minutes, then remove and let cool while preparing the filling.
- In a saucepan over medium heat, combine sweetened condensed milk, heavy cream, butter, and brown sugar. Stir constantly until mixture comes to a gentle boil.
- Reduce heat and simmer for 5–7 minutes, stirring frequently, until thickened slightly.
- Remove from heat and stir in vanilla extract and salt.
- Pour the caramel filling into the cooled crust and smooth the top.
- Refrigerate for at least 4 hours, or until fully set, before serving.


Wow, this sounds amazing! I love no-bake desserts—will definitely try this weekend. Thanks for sharing!
Wow, this sounds amazing! I love no-bake desserts—so easy yet always hit the spot. Can’t wait to try it!
Wow, this sounds amazing—I love no-bake desserts! Have you tried swapping the caramel for dark chocolate ganache?
Wow, this sounds amazing! I’ve always struggled with no-bake pies—hopefully, this one turns out perfectly for my weekend brunch.
Wow, this sounds amazing! I’ve never tried a no-bake pie before—can’t wait to give it a go. Thanks for the easy recipe!