Easy Little Debbie Cake Bites Recipe
Easy Cake Balls That Taste Like Birthday Party Magic
If you’ve ever scraped the last bit of frosting off a cake plate and thought, “This deserves a second life,” then these cake balls are your answer. No fancy equipment, no baking required (unless you count the original cake), and they come together faster than you can preheat an oven. I’ve been making these for years—church bake sales, baby showers, even as midnight snacks when the sweet tooth strikes. They’re rich, fudgy, and coated in a crisp chocolate shell that snaps just right.
What Is a Cake Ball?
Cake balls are bite-sized treats made by crumbling baked cake, mixing it with frosting to form a dough-like consistency, rolling it into balls, and dipping them in melted chocolate or candy coating. Think of them as cake truffles—but simpler and way more forgiving. Unlike traditional truffles that rely on heavy cream and precise ganache ratios, cake balls use everyday ingredients you probably already have: leftover cake, store-bought or homemade frosting, and chocolate chips. They’re popular at parties because they’re easy to eat, visually charming, and endlessly customizable. Plus, they solve the age-old problem of what to do with that half-eaten Sheet Cake sitting in your fridge.
Enjoying this article?
Subscribe and never miss an update.
We respect your privacy. Unsubscribe at any time.
Why You’ll Love This Recipe
First off, it’s practically foolproof. Even if your cake is a little dry or your frosting is slightly too sweet, the combo balances out into something irresistibly moist and rich. I love that you can use nearly any cake flavor—chocolate, vanilla, red velvet, even Carrot Cake—and pair it with complementary frosting. The texture is key: dense enough to hold its shape but tender enough to melt in your mouth. And let’s be honest, there’s something deeply satisfying about rolling tiny, perfect spheres between your palms while powdered sugar dusts your fingertips like snow.
Another win? These are freezer-friendly and actually taste better after a day or two in the fridge, as the flavors meld. They’re also a total crowd-pleaser for kids’ parties, teacher gifts, or holiday cookie exchanges. My go-to move is making a big batch, freezing half, and pulling them out during busy weeks when I need a quick dessert that feels special. Plus, they look adorable on a platter with sprinkles or edible glitter—no piping bag required.
How to Make Cake Balls
Quick Overview
This recipe starts with one 9×13-inch baked cake (store-bought or homemade works!), which you crumble and mix with about ¾ cup of frosting until it forms a pliable dough. Roll into 1-inch balls, chill until firm, then dip in melted chocolate coating. The whole process takes under an hour, including chilling time. No stand mixer, no thermometers—just a bowl, a spoon, and your hands.
Ingredients
You’ll need:
- 1 (9×13-inch) baked cake, cooled completely
- ¾ cup frosting (vanilla, chocolate, or cream cheese—your choice)
- 12 oz melting chocolate or candy coating (white, dark, or milk)
- Optional: sprinkles, crushed nuts, or shredded coconut for topping
Step-by-Step Instructions
In a large bowl, crumble the cooled cake into fine crumbs using your hands or a fork. Add the frosting and mix until fully combined—it should feel like moist cookie dough. If it’s too dry, add another tablespoon of frosting; if too wet, toss in a spoonful of powdered sugar. Roll into 1-inch balls (about 2 tablespoons each) and place on a parchment-lined tray. Chill in the fridge for at least 30 minutes—this is crucial so they don’t fall apart when dipping.
Melt the chocolate coating according to package instructions (I microwave in 30-second bursts, stirring between). Using a fork or dipping tool, lower each chilled ball into the chocolate, tap off excess, and place back on the parchment. Add sprinkles immediately if using. Let set at room temperature or in the fridge for 10–15 minutes.
What to Serve It With
Cake balls shine solo, but they’re also lovely alongside a cup of coffee or tea, stacked on a dessert board with macarons and brownies, or tucked into mini cupcake liners for gifting. For a festive twist, serve them on wooden skewers as dessert “lollipops” at birthday parties. They pair especially well with sparkling beverages—the slight fizz cuts through the richness perfectly.
Top Tips for Perfecting Your Cake Balls
Chill those balls! Skipping the refrigeration step is the #1 reason cake balls fall apart during dipping. Also, don’t overmix the cake and frosting—just until combined. Overworking makes them gummy. My secret tip? Roll the balls slightly oblong instead of perfectly round—they sit flatter on the tray and look more artisanal. And if your chocolate coating is too thick, stir in a teaspoon of coconut oil to thin it without compromising the snap.
Storing and Reheating Tips
Store cake balls in an airtight container in the fridge for up to 1 week, or freeze for up to 3 months. Separate layers with parchment to prevent sticking. Let frozen ones thaw in the fridge overnight. They don’t need reheating—but if you’re serving them at a party and want them at room temp, take them out 20 minutes ahead. Cold cake balls can taste overly dense.
Frequently Asked Questions
Final Thoughts
These cake balls aren’t just a recipe—they’re a little act of kitchen magic. Turning leftover cake into something elegant and crave-worthy feels like a secret only bakers know. Whether you’re feeding a crowd or just treating yourself after a long day, they deliver joy in every bite. So next time you’ve got a cake that’s seen better days, don’t toss it. Roll it, dip it, and watch it disappear.
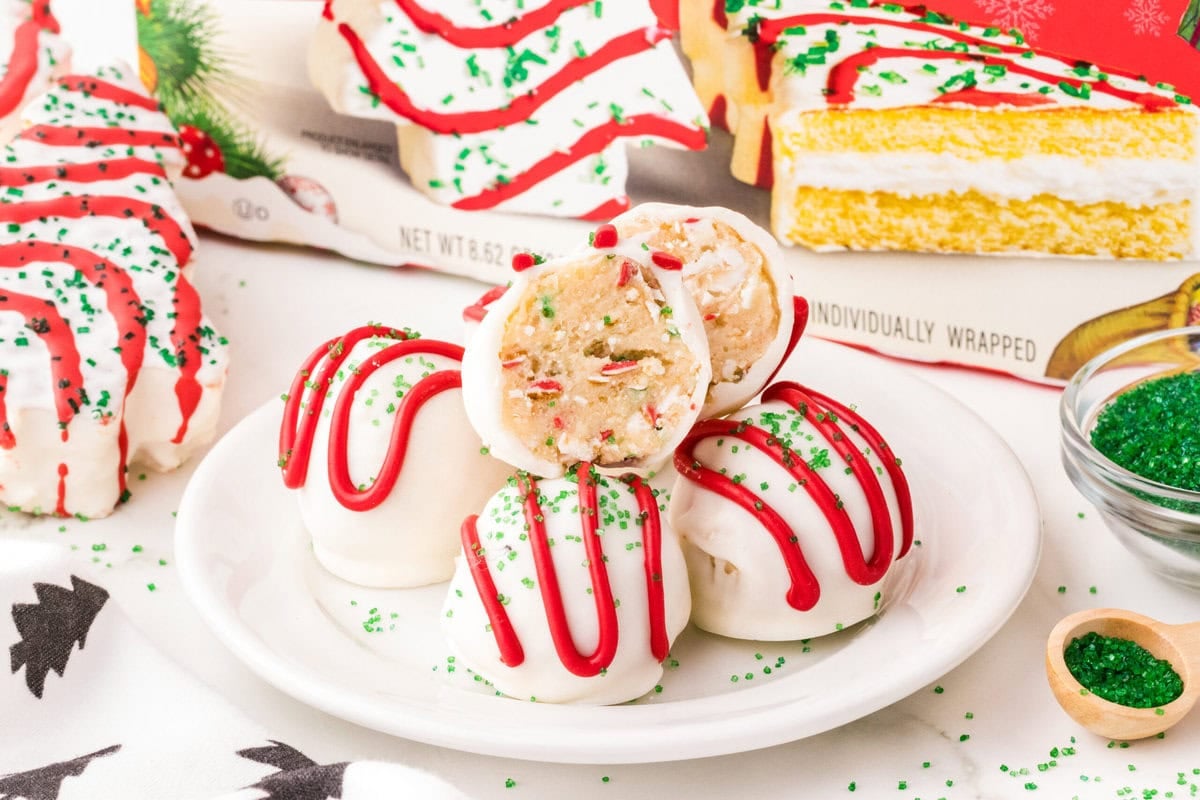
Easy Little Debbie Cake Bites Recipe
Ingredients
Method
- Crumble the Little Debbie snack cakes into a large mixing bowl until they resemble fine crumbs.
- Add the softened cream cheese and vanilla extract to the crumbs. Mix thoroughly until a thick, moldable dough forms.
- Roll the mixture into 12 small balls (about 1 inch in diameter) and place them on a parchment-lined baking sheet.
- Freeze the cake balls for 15 minutes to firm them up.
- In a microwave-safe bowl, melt the chocolate chips and coconut oil in 30-second intervals, stirring between each, until smooth.
- Dip each frozen cake ball into the melted chocolate, coating completely. Use a fork to lift and let excess drip off.
- Place the coated bites back on the parchment paper and let them set at room temperature or in the refrigerator until the chocolate hardens.
Ooh, I love this idea—turning leftover cake into something extra fun! Definitely trying this with my next dessert cleanup.
I love this idea—who knew cake scraps could become such a fun treat? Definitely adding this to my weekend baking plan!
These cake bites are such a fun twist on leftovers—perfectly sweet and easy to make! Love how they turn scraps into something magical.
I love this idea—who knew leftover Little Debbie cake could be turned into such adorable treats? Definitely trying this!