Easy DIY Dog Treats Your Pup Will Love
Easy Homemade Dog Treats Ready in 30 Minutes
These homemade dog treats are the real deal—wholesome, simple, and made with ingredients you probably already have in your pantry. No weird fillers, no mystery powders—just real food for your pup. I started baking these after my golden retriever, Milo, turned up his nose at store-bought biscuits. Now he sits by the oven every time I pull out the mixing bowl. If your dog’s been giving you that “really? again?” look during treat time, this recipe might just change everything.
What Is This Dog Treat Recipe?
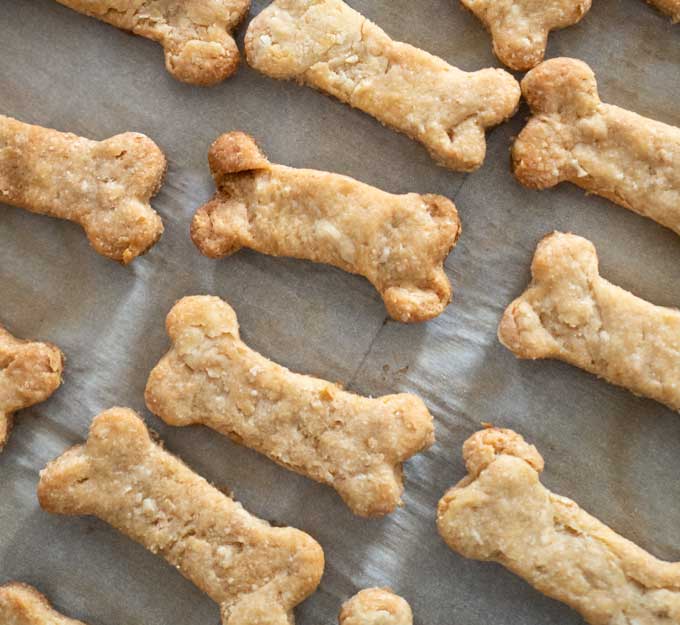
This is a basic, no-fuss dog treat recipe that uses just five pantry staples: whole wheat flour, rolled oats, Peanut Butter (xylitol-free!), an egg, and a splash of water. The dough comes together in minutes, rolls out easily, and bakes into crunchy, bone-shaped biscuits that keep well for weeks. It’s perfect for dogs of all sizes—just cut smaller shapes for tiny pups or break larger ones into pieces. Unlike commercial treats packed with preservatives and artificial flavors, these are baked with care and transparency. You know exactly what’s going into your dog’s belly, and honestly, that peace of mind is worth more than any fancy packaging.
Enjoying this article?
Subscribe and never miss an update.
We respect your privacy. Unsubscribe at any time.
Why You’ll Love This Recipe
First off, it’s ridiculously easy. If you can stir and roll dough, you can make these. There’s no special equipment—just a bowl, spoon, rolling pin, and cookie cutter (or a knife if you’re freehanding it like I often do). The ingredient list is short and budget-friendly, which means you won’t be Googling “what is maltodextrin?” halfway through baking. Plus, dogs go absolutely nuts for the Peanut Butter aroma—it’s like their version of cinnamon rolls fresh from the oven.
Another win? These treats are customizable. Got a pup with a sensitive stomach? Swap the whole wheat flour for oat or coconut flour. Peanut Butter not on hand? Sunflower seed butter works great (just double-check it’s unsweetened and salt-free). And because they’re baked, not fried, they’re lighter and easier on digestion. I’ve even used these as training rewards—small, crunchy, and high-value enough to keep my dog focused during agility practice. Honestly, once you see how happy your dog is nibbling on something you made yourself, store-bought just doesn’t cut it anymore.
How to Make Dog Treats
Quick Overview
This recipe makes about 20 medium-sized treats and takes roughly 30 minutes from start to finish. You’ll mix dry and wet ingredients separately, combine them into a stiff dough, roll it out, cut into shapes, and bake at 350°F until golden and crisp. Let them cool completely before serving—and storing. It’s that straightforward.
Ingredients
You’ll need:
- 1 cup whole wheat flour
- ½ cup rolled oats (gluten-free if needed)
- ¼ cup natural peanut butter (xylitol-free—this is critical!)
- 1 large egg
- 2–3 tablespoons water (as needed)
Step-by-Step Instructions
In a medium bowl, whisk together the flour and oats. In another bowl, beat the egg and mix in the peanut butter until smooth. Gradually add the wet mixture to the dry ingredients, stirring with a fork until a shaggy dough forms. If it’s too dry, add water one tablespoon at a time—just enough to bring it together. Knead lightly on a floured surface for 30 seconds, then roll out to about ¼-inch thickness. Use a bone-shaped cutter (or a knife) to cut out treats and place them on a parchment-lined baking sheet. Bake at 350°F for 20–25 minutes, or until firm and lightly golden. Cool completely on a wire rack before serving.
What to Serve It With
These dog treats are meant to be enjoyed solo—no dipping sauces or fancy pairings needed! But if you’re making a special occasion out of it (hello, doggy birthday!), you can serve them alongside a small bowl of plain yogurt or mashed sweet potato as a celebratory snack. Just remember: moderation is key. These are treats, not meals. A few per day is plenty for most dogs.
Top Tips for Perfecting Your Dog Treats
One unique trick I’ve learned? Toast the oats in a dry skillet for 2–3 minutes before adding them to the dough. It deepens the nutty flavor and makes the treats even more aromatic—your dog will smell them from the other room. Also, don’t overbake! Slightly softer edges are fine; they’ll crisp up as they cool. And if your dog has dental sensitivities, press a fork gently into the surface before baking to create little ridges that are easier to chew.
Storing and Reheating Tips
Store cooled treats in an airtight container at room temperature for up to 2 weeks, or freeze for up to 3 months. No reheating needed—they’re best served at room temp. If frozen, just let them sit out for 10 minutes before offering one to your pup.
Frequently Asked Questions
Final Thoughts
Baking these dog treats has become one of my favorite little rituals—it’s calming, rewarding, and honestly, watching Milo’s tail thump against the floor when he hears the oven timer is pure joy. You don’t need to be a pro baker or have a fancy kitchen to make something your dog will love. Just five ingredients, a bit of time, and a whole lot of heart. Give it a try—you might just find yourself reaching for the mixing bowl more often than the treat jar.
Easy DIY Dog Treats Your Pup Will Love
Ingredients
Method
- Preheat your oven to 350°F (175°C) and line a baking sheet with parchment paper.
- In a large mixing bowl, combine the whole wheat flour and rolled oats.
- In a separate bowl, whisk together the egg, peanut butter, and water or chicken broth until smooth.
- Gradually add the wet ingredients to the dry ingredients, stirring until a dough forms. If too sticky, add a little more flour.
- Roll out the dough on a floured surface to about 0.25-inch thickness and cut into desired shapes using cookie cutters or a knife.
- Place the treats on the prepared baking sheet and bake for 18–22 minutes, or until golden and firm.
- Let cool completely before serving. Store in an airtight container for up to 2 weeks.
So easy and my dog went wild for them! Will definitely make these again.
So simple and healthy—my dog loves them! I’ll definitely be making these regularly.
These look so simple and healthy—my dog would love them! Can’t wait to try the peanut butter ones.
These treats look super easy and healthy—my dog would love them! Definitely trying this recipe soon.