Colorful Alphabet Cookies How to Bake Them
Alphabet Cookies: A Sweet Way to Spell Out Joy
I’ll never forget the first time I made alphabet cookies with my niece—she was barely four, her tiny fingers dusted in flour, carefully pressing each letter into the dough like she was writing a secret message just for me. There’s something magical about these little treats: they’re not just cookies, they’re tiny edible stories. Whether you’re spelling out a name, celebrating a birthday, or just adding a playful twist to your cookie jar, alphabet cookies bring a sense of whimsy and warmth that’s hard to beat. They’re simple enough for a weeknight baking session but special enough for a party centerpiece. And honestly? Once you get the hang of it, you’ll want to make them for every occasion—even “just because.” Today, I’m sharing my go-to recipe—tested, tweaked, and loved by everyone who’s tried it. So grab your rolling pin and let’s bake some joy, one letter at a time.
What Is Alphabet Cookies?
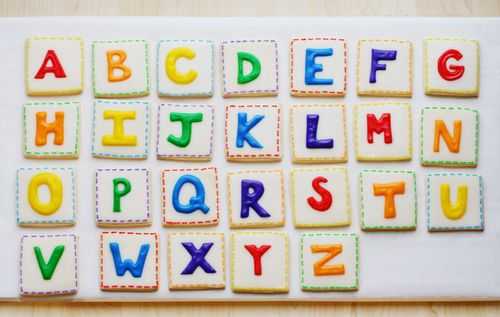
Alphabet cookies are exactly what they sound like—sweet, buttery shortbread-style cookies shaped into the letters of the alphabet. Think of them as edible typefaces! They’re crisp on the edges, tender in the center, and lightly sweet—perfect for both kids and adults. Unlike decorated sugar cookies that rely heavily on icing, these shine with their classic flavor and charming shapes. You can find metal or plastic alphabet cookie cutters at most kitchen stores (or online), and once you have those, the possibilities are endless. I’ve used them for baby showers (spelling “Welcome, Baby Mia!”), teacher gifts (“Thank You, Ms. Lee”), and even as place cards at dinner parties. They’re versatile, nostalgic, and surprisingly easy to make. Plus, they don’t require any fancy decorating skills—just a little patience and a love for baking with intention.
Enjoying this article?
Subscribe and never miss an update.
We respect your privacy. Unsubscribe at any time.
Why You’ll Love This Recipe
This alphabet cookie recipe is my absolute favorite because it balances simplicity with charm. The dough is forgiving—it doesn’t spread much during baking, so your letters stay crisp and legible. It’s also made with pantry staples: butter, sugar, flour, and a pinch of salt. No Cream Cheese, no egg yolks, no fuss. Just rich, melt-in-your-mouth goodness that holds its shape beautifully. I’ve baked these dozens of times, and every batch turns out golden, fragrant, and utterly delightful.
What really wins me over, though, is how personal they feel. Baking alphabet cookies isn’t just about following a recipe—it’s about connection. Maybe you’re spelling out your grandkid’s name for their first birthday, or surprising your partner with their initials on a Tuesday morning. These cookies carry meaning in every letter. And because they’re not overly sweet, they pair wonderfully with tea, coffee, or even a glass of cold milk. They’re also fantastic for gifting—tuck them into a cute jar with a handwritten note, and you’ve got an instant hit. Whether you’re a seasoned baker or just starting out, this recipe invites you to slow down, get creative, and savor the little moments—one alphabet cookie at a time.
How to Make Alphabet Cookies
Quick Overview
This recipe makes about 30–36 alphabet cookies (depending on cutter size) and takes roughly 2 hours from start to finish, including chilling time. The dough comes together in under 10 minutes, chills for 30–60 minutes (which helps prevent spreading), and bakes in just 8–10 minutes per batch. It’s a straightforward process: cream butter and sugar, mix in dry ingredients, chill, roll, cut, bake, and cool. No special equipment needed beyond a rolling pin and your trusty alphabet cutters. Pro tip: chill your cut cookies again for 10 minutes before baking—this keeps those delicate letter shapes sharp!
Ingredients
You’ll need just five simple ingredients:
- 1 cup (2 sticks / 226g) unsalted butter, softened
- ¾ cup (150g) granulated sugar
- 2 ½ cups (315g) all-purpose flour
- ½ teaspoon fine sea salt
- 1 teaspoon pure vanilla extract (optional, but adds lovely depth)
Step-by-Step Instructions
In a large bowl, cream the softened butter and sugar together until light and fluffy—about 2–3 minutes with a hand mixer. Stir in the vanilla (if using). Gradually add the flour and salt, mixing just until a soft dough forms. Don’t overmix! Shape the dough into a disc, wrap it in plastic, and chill for at least 30 minutes (up to 2 days—or freeze for later use).
Preheat your oven to 350°F (175°C) and line baking sheets with parchment paper. On a lightly floured surface, roll the dough to about ¼-inch thickness. Dip your alphabet cutters in flour to prevent sticking, then cut out letters. Gently transfer them to the prepared sheets, spacing them about 1 inch apart. For extra-sharp edges, pop the trays back into the fridge for 10 minutes before baking.
Bake for 8–10 minutes, or until the edges are just barely golden. Let cool on the sheet for 5 minutes before transferring to a wire rack. Enjoy warm or store for later—they stay fresh for up to a week!
What to Serve It With
Alphabet cookies are wonderfully versatile! Serve them alongside a steaming cup of Earl Grey Tea or hot chocolate for a cozy afternoon treat. They’re also perfect with a glass of cold milk—classic and comforting. For parties, arrange them on a tiered stand with other bite-sized sweets like mini muffins or fruit tarts. If you’re feeling festive, pair them with a scoop of vanilla ice cream for a playful dessert. And don’t forget coffee—their subtle sweetness complements bold brews beautifully. Really, though? They’re so good on their own that they don’t need much company. Just good vibes and maybe a smile.
Top Tips for Perfecting Your Alphabet Cookies
First, keep everything cold—cold dough, cold cutters, cold baking sheets. This prevents spreading and keeps your letters crisp. Second, don’t skip the chilling step! Even 10 extra minutes in the fridge before baking makes a huge difference. Third, roll your dough between two sheets of parchment paper—it’s easier to handle and creates less mess. Fourth, if your dough gets too soft while rolling, pop it back in the fridge for 5–10 minutes. And finally, embrace imperfection! A slightly wobbly “S” or a crooked “Q” just adds character. These aren’t meant to be museum pieces—they’re meant to be loved, shared, and eaten with joy.
Storing and Reheating Tips
Store cooled alphabet cookies in an airtight container at room temperature for up to 7 days. Layer them with parchment paper to prevent sticking. They also freeze beautifully! Place cooled cookies in a freezer-safe bag for up to 3 months. To refresh frozen cookies, simply let them come to room temperature or warm them in a 300°F (150°C) oven for 3–4 minutes. Avoid microwaving—it can make them soggy. And remember: these cookies taste best within the first few days, so don’t hesitate to share them with neighbors, coworkers, or that friend who always needs a little sweetness in their day.
Frequently Asked Questions
Final Thoughts
Baking alphabet cookies has become one of my most cherished rituals—a way to slow down, connect, and create something meaningful from simple ingredients. There’s a quiet magic in watching a child’s face light up when they see their name spelled out in golden-brown pastry, or in handing a friend a cookie that says “You’re Amazing” after a tough week. These aren’t just treats; they’re tiny gestures of love, baked with care and shared with heart. So whether you’re celebrating a milestone or simply craving something sweet, I hope this recipe brings a little extra joy to your kitchen. Happy baking—and don’t forget to save me an “L” for “Love.” 💛
Colorful Alphabet Cookies How to Bake Them
Ingredients
Method
- In a medium bowl, whisk together the flour, baking powder, and salt. Set aside.
- In a large bowl, cream together the softened butter and sugar until light and fluffy, about 2-3 minutes.
- Beat in the egg and vanilla extract until fully combined.
- Gradually add the dry ingredients to the wet ingredients, mixing on low speed until just combined.
- Divide the dough into 4 equal portions. Add a different gel food coloring to each portion and knead until the color is evenly distributed.
- Roll each colored dough portion to about 0.25-inch thickness on a lightly floured surface.
- Use alphabet cookie cutters to cut out letters. Transfer to a parchment-lined baking sheet, spacing them about 1 inch apart.
- Bake at 350°F (175°C) for 10-12 minutes, or until the edges are lightly golden.
- Let cookies cool on the baking sheet for 5 minutes before transferring to a wire rack to cool completely.
- Decorate with edible glitter or sprinkles if desired, once cookies are completely cool.


Such a sweet idea—alphabet cookies are perfect for little hands and big smiles! I love how they combine baking with learning.
Such a sweet memory! Making alphabet cookies with little ones is the perfect blend of fun and learning—plus, they’re delicious!
Such a sweet memory! Making alphabet cookies with kids is such a fun way to spend time together.
Such a sweet memory! Making alphabet cookies with my nephew was just as magical—he loved picking out the letters to spell his name.
These sound adorable! My kids loved baking alphabet cookies too—such a fun way to teach them letters and creativity.