Mini Cheeseburgers How to Make Easy Sliders
You know that feeling when you’re hosting friends, the kitchen’s buzzing, and you want something crowd-pleasing but not complicated? That’s exactly why I keep coming back to these cheeseburger sliders. They’re my go-to for game nights, birthday parties, or even just a cozy Friday dinner with the family. There’s something magical about those tiny, juicy beef patties tucked into soft slider buns with melty cheese and all the classic fixings—it’s comfort food in miniature form! I first made them years ago for a potluck, and ever since, they’ve been requested at every gathering. Honestly, they disappear faster than I can say “pass the ketchup.” If you’ve never tried making them from scratch, trust me—you’re in for a treat. And the best part? They come together in under 30 minutes, so you’re not stuck in the kitchen while everyone else is having fun.

What Is Cheeseburger Sliders?
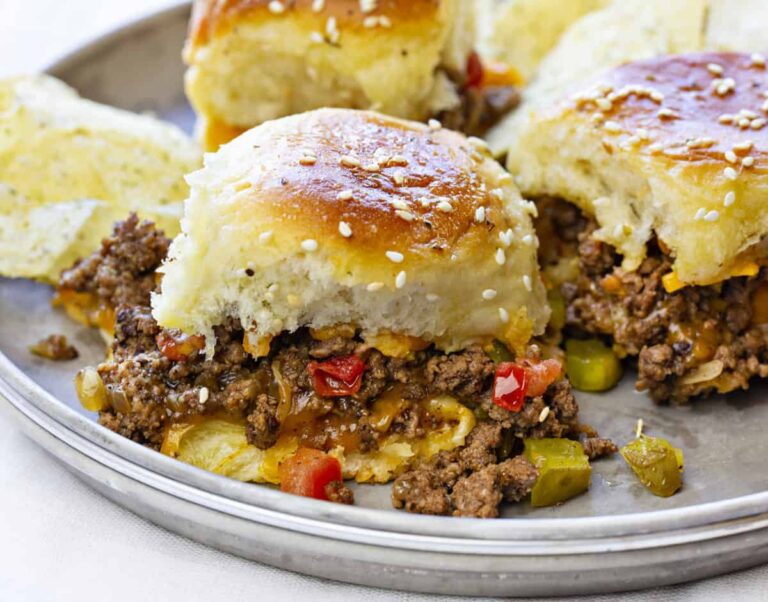
Cheeseburger sliders are essentially mini versions of the classic American cheeseburger—think bite-sized burgers served on small, pillowy buns. But don’t let their size fool you: they pack all the flavor of a full-sized burger in a handheld, party-friendly package. Typically made with seasoned ground beef formed into small patties, grilled or pan-seared until juicy, and topped with melted cheddar (or your favorite cheese), they’re often finished with diced onions, pickles, lettuce, and a swipe of ketchup or special sauce. What makes them so special is their versatility—you can customize them endlessly, serve them hot off the skillet, and watch them vanish in minutes. Whether you’re feeding a crowd or just craving something nostalgic and satisfying, cheeseburger sliders hit the spot every single time.
Enjoying this article?
Subscribe and never miss an update.
We respect your privacy. Unsubscribe at any time.
Why You’ll Love This Recipe
First off, these cheeseburger sliders are ridiculously easy to make—no fancy equipment or hard-to-find ingredients required. Just grab some ground beef, slider buns, cheese, and your favorite toppings, and you’re golden. I love that they’re perfect for both casual weeknights and festive gatherings; they feel indulgent without being fussy. Plus, kids adore them (hello, picky eater approval!), and adults can’t resist grabbing “just one more.” Another huge win? You can prep the patties ahead of time and cook them right before serving, so there’s minimal last-minute stress. And honestly, there’s nothing quite like the smell of sizzling beef and melting cheese filling your kitchen—it instantly puts everyone in a good mood. Whether you’re feeding two or twenty, these sliders deliver big flavor in a small, shareable format that feels both nostalgic and fresh. Once you try this recipe, it’ll become a staple in your rotation—I promise!
How to Make Cheeseburger Sliders
Quick Overview
This recipe makes about 12 cheeseburger sliders using simple pantry staples and fresh ingredients. You’ll shape ground beef into small patties, cook them until perfectly browned and juicy, melt cheese on top, and assemble everything on soft slider buns with your favorite toppings. The whole process takes less than 30 minutes from start to finish, making it ideal for busy nights or impromptu get-togethers. It’s straightforward, forgiving, and totally customizable—so don’t be afraid to make it your own!
Ingredients
You’ll need: 1 pound (450g) ground beef (80/20 blend works best for juiciness), 12 slider buns (Hawaiian rolls are my favorite!), 6 slices of cheddar cheese (cut in half to fit the sliders), 1 small onion (finely diced), ¼ cup diced pickles, lettuce leaves (optional), ketchup and mustard for serving, salt and freshly ground black pepper to taste, and a drizzle of olive oil or butter for cooking.
Step-by-Step Instructions
In a large bowl, gently mix the ground beef with a pinch of salt and pepper—don’t overwork it, or the patties will get tough. Divide the mixture into 12 equal portions and shape them into small, flat patties (about 2 inches wide). Heat a skillet or grill pan over medium-high heat and add a little oil or butter. Cook the patties for 2–3 minutes per side, until nicely browned and cooked through. During the last minute of cooking, place a half-slice of cheese on each patty and cover the pan briefly to let it melt. While the patties cook, lightly toast the slider buns if you like—just pop them in a warm oven or on the skillet for a minute. To assemble, place a cooked cheesy patty on the bottom half of each bun, then add diced onions, pickles, lettuce (if using), and a dab of ketchup or mustard. Top with the bun lid and serve immediately while warm and melty!
What to Serve It With
These cheeseburger sliders pair beautifully with classic sides like crispy french fries, sweet potato wedges, or a simple green salad. For a fun twist, try serving them with loaded potato skins, coleslaw, or even a tangy corn salsa. If you’re hosting a party, set up a DIY slider bar with extra toppings like sliced jalapeños, bacon bits, or caramelized onions—let everyone build their own masterpiece! And don’t forget a cold drink: ice-cold lemonade, iced tea, or even a craft soda complements the richness perfectly.
Top Tips for Perfecting Your Cheeseburger Sliders
First, don’t skip the 80/20 ground beef—it keeps the patties moist and flavorful. Overmixing the meat leads to tough sliders, so handle it gently when forming patties. For extra flavor, add a splash of Worcestershire sauce or a minced garlic clove to the beef mixture. If you’re using Hawaiian rolls, brush the tops with melted butter and a sprinkle of everything bagel seasoning before toasting—it adds a delicious sweet-savory crunch. And here’s a pro tip: keep the toppings light so the slider doesn’t fall apart when you bite into it. Less is more when it comes to assembly!
Storing and Reheating Tips
Store any leftover sliders in an airtight container in the fridge for up to 2 days. To reheat, wrap them loosely in foil and warm in a 350°F (175°C) oven for about 10 minutes—this helps revive the bun without drying out the meat. Avoid the microwave if possible, as it can make the buns soggy. If you’ve got unbuilt components (like extra patties or toppings), store them separately and assemble fresh when ready to eat.
Frequently Asked Questions
Final Thoughts
These cheeseburger sliders aren’t just a recipe—they’re a mood, a memory, a little moment of joy shared around the table. Whether you’re feeding your family, hosting friends, or just treating yourself after a long day, they never fail to deliver comfort and smiles. I hope you give them a try and make them your own—add your favorite toppings, tweak the seasoning, or even swap in turkey or plant-based meat. However you serve them, I know they’ll become one of those recipes you reach for again and again. Happy cooking, and don’t forget to save me one!
Mini Cheeseburgers How to Make Easy Sliders
Ingredients
Method
- Preheat a skillet or griddle over medium-high heat.
- In a bowl, gently mix the ground beef with salt, pepper, and garlic powder. Avoid overmixing to keep the patties tender.
- Divide the beef into 8 equal portions and shape into small patties, slightly larger than the buns (they will shrink while cooking).
- Cook the patties in the skillet for 3–4 minutes per side, or until fully cooked through and browned.
- In the last minute of cooking, place a slice of American cheese on each patty and cover briefly to melt.
- While the patties cook, brush the cut sides of the slider buns with melted butter and toast them in a separate pan or under the broiler until golden.
- Assemble the sliders by placing a cheesy patty on the bottom half of each bun, then add pickles and diced onions if using. Top with the bun lid.
- Serve immediately while warm and enjoy these delicious mini cheeseburgers!


These look so tasty and easy to make—perfect for a quick, delicious snack when friends come over!
These mini cheeseburgers look perfect for game day! I’ll definitely try this—simple and delicious.
These mini cheeseburgers are perfect for parties — simple, delicious, and always a hit with guests. Love how easy they are to make!
Perfect for busy hosting nights—simple, delicious, and always a hit. Love how easy these sliders are!
These look perfect for game day or a casual get-together! I love that they’re simple but always a hit with guests.