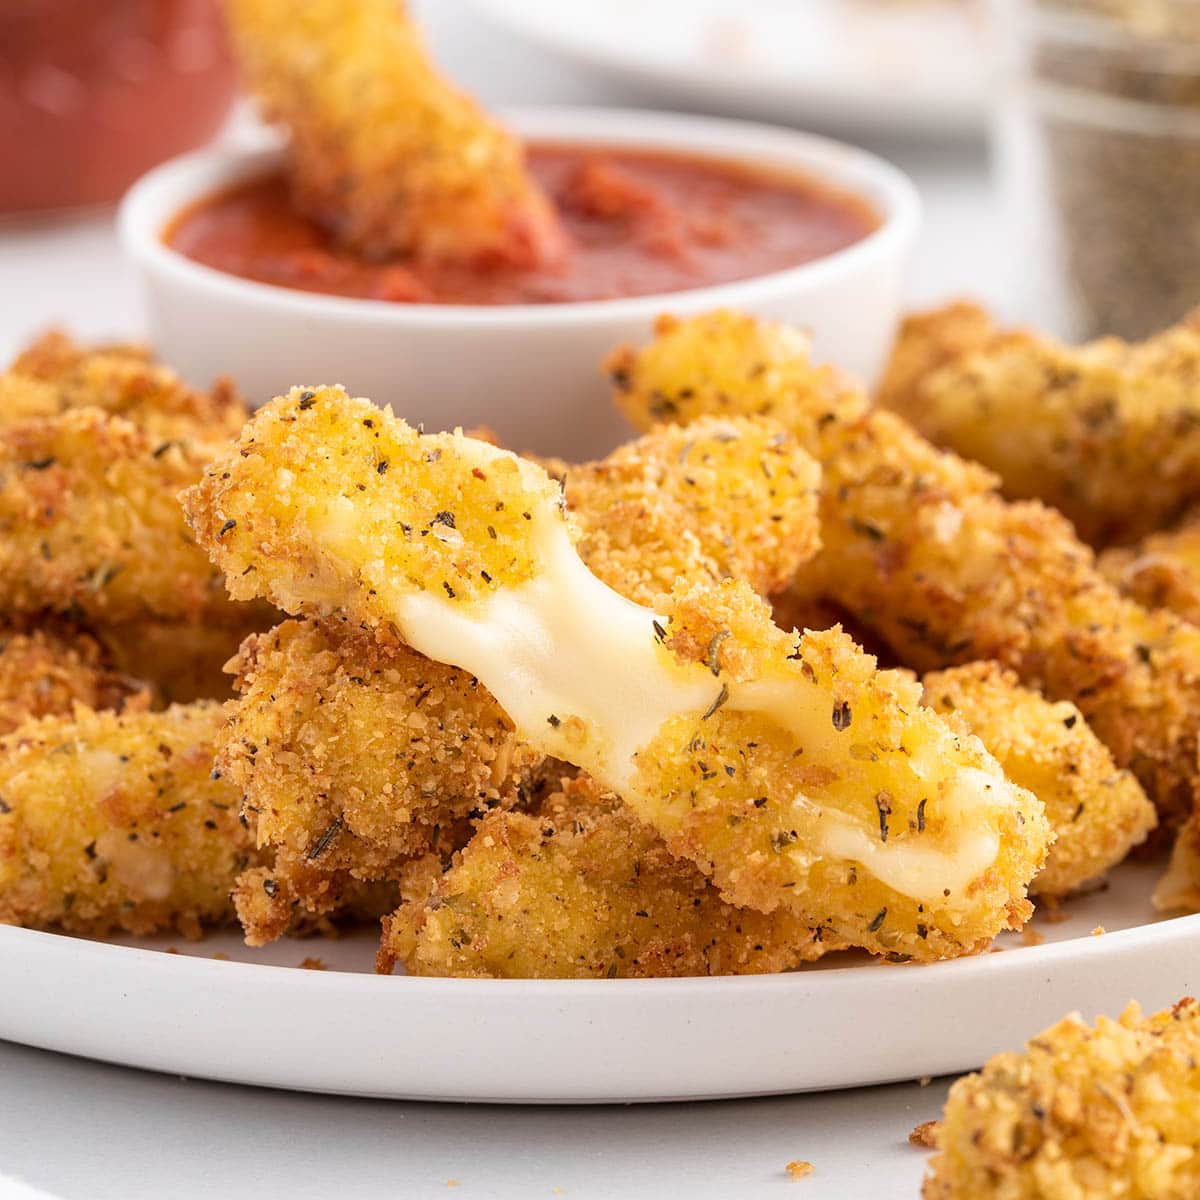
Easy Mozzarella Bites Recipe
The Cheese Sticks I’ve Been Sneaking Into Every Party Since 2019
You know that moment when you walk into a gathering, plate in hand, and within minutes someone whispers, “Wait—did you make those cheese sticks?” That’s been my life for the past five years. These aren’t just any frozen-aisle imposters; these are golden, crispy-on-the-outside, molten-on-the-inside cheese sticks that taste like they came straight from your nonna’s kitchen (even if your nonna lives in Ohio and hates cooking). I’ve perfected this recipe through countless dinner parties, Super Bowl Sundays, and one very memorable bridal shower where three guests asked for the recipe before the cake was even cut. They’re ridiculously easy, impossible to resist, and honestly? They might just become your new signature snack. So grab a cup of coffee, pull up a chair, and let me walk you through how I make them—because once you try these, store-bought just won’t cut it anymore.
What Is This Cheese Stick Recipe?
This is my go-to homemade cheese stick recipe—crispy, cheesy, and deeply satisfying without being greasy or heavy. Unlike the sad, rubbery versions you find in freezer aisles, these are made with real mozzarella, lightly coated in seasoned breadcrumbs, and baked (or fried, if you’re feeling indulgent) until they’re golden and oozing. They’re the kind of appetizer that disappears faster than you can say “second batch,” and they work just as well at a fancy cocktail party as they do during a lazy movie night. The secret? Using full-fat mozzarella sticks (not the low-moisture kind), a double-dip breading method, and a light egg wash that creates that perfect crunch without soaking up oil. It’s simple, nostalgic, and absolutely crave-worthy—the kind of recipe you’ll pass down to your kids (or at least text to your best friend at midnight when the craving hits).
Enjoying this article?
Subscribe and never miss an update.
We respect your privacy. Unsubscribe at any time.
Why You’ll Love This Recipe
First off, these cheese sticks are dangerously delicious—in the best way possible. You’ll love how quickly they come together (seriously, 15 minutes of prep max), and how customizable they are. Want them extra herby? Toss some dried oregano or garlic powder into the breadcrumbs. Prefer a little kick? A pinch of red pepper flakes does wonders. Plus, they’re crowd-pleasers across the board: kids adore them, adults devour them, and even your pickiest cousin will ask for seconds. I also appreciate that you can bake them for a lighter version or fry them for that classic carnival-style crisp—both methods work beautifully, so you can choose based on your mood or dietary preference. And let’s be real: there’s something deeply joyful about pulling a tray of golden cheese sticks out of the oven, watching the cheese slowly peek through the crust, and knowing you’ve just made everyone in the room very, very happy. It’s comfort food at its finest—unpretentious, warm, and made with love (and a lot of cheese).
How to Make Cheese Sticks
Quick Overview
This recipe makes about 12 cheese sticks and takes roughly 30 minutes from start to finish—including freezing time! The key steps are: freezing the mozzarella sticks briefly so they hold their shape, coating them in flour, egg wash, and seasoned breadcrumbs (twice for extra crunch), then either baking at 400°F for 8–10 minutes or frying in oil until golden. No fancy equipment needed—just a baking sheet, a couple of bowls, and your favorite slotted spoon if frying. Pro tip: don’t skip the 15-minute freeze before breading; it’s what keeps the cheese from leaking out during cooking.
Ingredients
You’ll need: 12 full-fat mozzarella string cheese sticks, 1 cup all-purpose flour, 2 large eggs beaten with 2 tablespoons water, 1½ cups seasoned breadcrumbs (I use Italian-style), ½ teaspoon garlic powder, ½ teaspoon dried parsley, and salt to taste. For frying: vegetable or canola oil (about 2 inches deep in a pot). If baking, just a light spray of cooking oil works great.
Step-by-Step Instructions
Start by unwrapping the mozzarella sticks and placing them on a plate. Pop them in the freezer for 15 minutes—this firms them up so they won’t melt too fast. While they chill, set up your breading station: one bowl with flour, one with beaten eggs, and one with breadcrumbs mixed with garlic powder, parsley, and a pinch of salt. Take the cheese sticks out of the freezer and cut each in half (so you get 24 shorter sticks—perfect for snacking!). Roll each piece in flour, dip in egg, then coat thoroughly in breadcrumbs. For extra crunch, repeat the egg and breadcrumb step once more. Place them on a parchment-lined tray. At this point, you can freeze them again for 30 minutes if frying (helps prevent splattering), or bake immediately at 400°F for 8–10 minutes until golden. To fry, heat oil to 375°F and cook in batches for 30–45 seconds per side—don’t overcrowd the pan! Drain on paper towels and serve hot.
What to Serve It With
These cheese sticks shine alongside a vibrant marinara sauce—warm or room temperature, it doesn’t matter. I like to make a quick homemade version with crushed tomatoes, garlic, and fresh basil, but even good-quality jarred sauce works beautifully. For a fun twist, offer a side of ranch dressing, spicy sriracha mayo, or even a sweet chili dip. They’re also fantastic paired with a crisp green salad (to balance the richness) or served as part of a loaded appetizer platter with garlic knots, olives, and pepperoncini. Honestly, though? Sometimes they’re best all on their own—right out of the oven, with a cold beer or a glass of crisp white wine. No frills, just pure cheesy joy.
Top Tips for Perfecting Your Cheese Sticks
First, always use full-fat mozzarella—the low-moisture kind won’t melt properly and can turn rubbery. Second, don’t skip the initial freeze! It’s non-negotiable for clean breading and even cooking. Third, if you’re baking, lightly spray the coated sticks with oil before popping them in the oven—it helps achieve that golden, crispy exterior. Fourth, work in small batches when frying to keep the oil temperature steady; if it drops too low, the breading absorbs grease and gets soggy. Finally, serve immediately! Cheese sticks are best enjoyed hot and gooey—though I won’t judge if you sneak one while they’re still warm from the pan (I do it every time).
Storing and Reheating Tips
If you somehow have leftovers (unlikely, but hey), store them in an airtight container in the fridge for up to 3 days. To reheat, avoid the microwave—it makes them soggy. Instead, pop them on a baking sheet in a 375°F oven for 5–7 minutes until warmed through and crispy again. You can also freeze unbaked breaded sticks for up to 2 months: just lay them flat on a tray, freeze solid, then transfer to a zip-top bag. When ready to cook, bake or fry straight from frozen—just add an extra minute or two to the cooking time. Trust me, having a stash of these in the freezer is a game-changer for last-minute guests or sudden cravings.
Frequently Asked Questions
Final Thoughts
These cheese sticks aren’t just a recipe—they’re a mood, a memory, a little slice of happiness on a plate. Whether you’re hosting a party, treating yourself after a long week, or just wanting to impress your family with something simple yet spectacular, these deliver every single time. I’ve shared this recipe with neighbors, coworkers, and even strangers at potlucks (yes, really), and the response is always the same: wide eyes, happy sighs, and immediate requests for the recipe. So go ahead—give them a try. I promise you won’t regret it. And if you do end up making them for your next gathering? Save me one. 😉
Homemade Cheese Sticks
Ingredients
Method
- Unwrap the mozzarella sticks and place them on a plate. Freeze them for 15 minutes.
- Set up your breading station with one bowl of flour, one with beaten eggs, and one with seasoned breadcrumbs mixed with garlic powder, parsley, and salt.
- Take the cheese sticks out of the freezer and cut each in half to get 24 shorter sticks.
- Roll each cheese stick piece in flour, dip it in the egg wash, then thoroughly coat it in breadcrumbs.
- For extra crunch, repeat the egg and breadcrumb coating.
- Place the breaded sticks on a parchment-lined tray.
- Freeze again for 30 minutes if frying, or bake immediately.
- To bake, preheat your oven to 400°F and bake for 8–10 minutes until golden.
- For frying, heat oil to 375°F and fry in batches for 30–45 seconds per side until golden. Do not overcrowd the pan.
- Drain on paper towels and serve hot.

These are such a hit every time! I always bring them to parties and everyone asks for the recipe.
I love these—they’re always a hit! Perfect for parties, so simple yet impressive.
Ooooh these look so good! I’m definitely trying this recipe this weekend—cheese bites are always a hit at parties. Can’t wait to see how they turn out!
These bites are a party staple! I’ve been making them for years too—always disappear so fast. 😉
These bites are a game-changer! I’ve been using them at every event too—always disappear so fast.