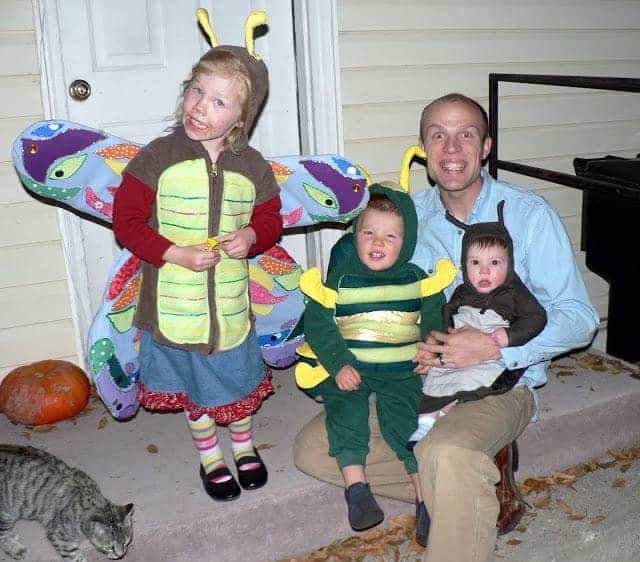
Easy Kids’ Halloween Outfits to DIY
Spooky & Sweet: The Ultimate Halloween Treat That’s Actually Delicious
You know that feeling when Halloween rolls around and you’re torn between crafting the most epic costume and still wanting to serve something that doesn’t taste like cardboard? I’ve been there—standing in my kitchen at 9 p.m., half-dressed as a witch, frantically googling “easy Halloween desserts that look cool but won’t make my friends gag.” That’s when I stumbled on this little gem of a recipe, and honestly? It’s become my go-to every October. It’s festive without being gimmicky, surprisingly simple to pull together, and—most importantly—it actually tastes amazing. Whether you’re hosting a party, bringing something to a potluck, or just treating yourself after a long night of trick-or-treating with the kids, this treat hits all the right notes. Plus, it’s got that perfect balance of spooky charm and homemade warmth that makes everyone ask, “Wait… did you *make* this?” Spoiler: Yes. And I’m about to share exactly how.
What Is This Festive Halloween Treat?
This isn’t just another store-bought cookie dipped in orange frosting and called “Halloween-themed.” This is a from-scratch, slightly spiced, soft-baked confection that looks like it came straight out of a haunted bakery—but tastes like your grandma’s best fall dessert. Think warm cinnamon, a hint of nutmeg, a whisper of molasses, and a tender crumb that melts in your mouth. The real magic? The way it’s shaped and decorated to resemble mini jack-o’-lanterns or ghostly mounds, depending on your mood (and your piping skills). It’s playful, nostalgic, and totally customizable—perfect for anyone who loves Halloween costumes *and* actually edible party food. No fondant required, no sugar art degrees needed. Just good ingredients, a little creativity, and maybe a playlist full of classic monster movies while you bake.
Enjoying this article?
Subscribe and never miss an update.
We respect your privacy. Unsubscribe at any time.
Why You’ll Love This Recipe
Let’s be real: most “Halloween desserts” are more about shock value than flavor. They’re要么 too sweet,要么 dry as bone, or so heavily dyed they leave your tongue blue for days. Not this one. This recipe strikes that sweet spot—pun absolutely intended—where fun meets function. First off, it’s ridiculously easy. If you can measure flour and crack an egg, you’ve got this. Second, it’s made with pantry staples you probably already have: brown sugar, butter, eggs, flour, and warm spices. No weird extracts or hard-to-find ingredients. Third—and this is huge—it actually scales beautifully. Whip up a half-batch for a cozy night in, or double it for a classroom party or neighborhood bash.
But my favorite part? How it brings people together. There’s something so joyful about watching kids (and let’s be honest, adults too) pick up a little ghost-shaped cookie or a pumpkin-swirl cupcake and grin like they’ve just discovered treasure. It’s not just dessert—it’s a conversation starter, a memory maker, and a tiny act of seasonal magic. Plus, since it’s not overly rich, you won’t feel guilty serving it alongside apple cider or a scoop of vanilla Ice Cream. It’s the kind of recipe that makes Halloween feel cozy, not chaotic.
How to Make This Spooktacular Treat
Quick Overview
This recipe comes together in under 30 minutes from bowl to oven, with minimal cleanup and maximum payoff. You’ll cream butter and sugar, add eggs and molasses for depth, then fold in spiced flour until just combined. The dough is soft but holds its shape beautifully—perfect for rolling into balls, pressing into muffin tins, or even piping into ghost shapes if you’re feeling fancy. Bake until lightly golden around the edges, then let cool just enough to handle before adding your festive touches. Whether you go full-on jack-o’-lantern with chocolate chips for eyes or keep it simple with a dusting of powdered sugar “fog,” the result is always crowd-pleasing.
Ingredients
You’ll need: 1 cup (2 sticks) unsalted butter, softened; ¾ cup packed brown sugar; 1 large egg; ¼ cup molasses (unsulphured); 2½ cups all-purpose flour; 1 tsp baking soda; 1 tsp ground cinnamon; ½ tsp ground ginger; ¼ tsp ground nutmeg; ¼ tsp salt; optional decorations like chocolate chips, white icing, or edible glitter.
Step-by-Step Instructions
In a large bowl, cream the softened butter and brown sugar until light and fluffy—about 2–3 minutes with a hand mixer. Beat in the egg and molasses until smooth. In a separate bowl, whisk together the flour, baking soda, cinnamon, ginger, nutmeg, and salt. Gradually add the dry ingredients to the wet mixture, mixing just until combined. Don’t overmix! Scoop the dough into 1½-tablespoon portions and roll into balls. Place them on a parchment-lined baking sheet, leaving space between each. For jack-o’-lanterns, gently press two chocolate chips into each ball for eyes and one for a nose. Bake at 350°F (175°C) for 10–12 minutes, until edges are set but centers still look soft. Let cool on the sheet for 5 minutes before transferring to a wire rack. Decorate as desired once completely cooled.
What to Serve It With
Pair these with a steaming mug of spiced apple cider or a cold glass of creamy eggnog for a truly autumnal experience. They also shine alongside a scoop of vanilla bean ice cream—especially if you drizzle a little Caramel Sauce over the top for extra decadence. For a non-dessert twist, serve them with a sharp cheddar cheese plate; the sweet-spiced cookies balance the savory notes perfectly. And if you’re hosting a costume party? Set out a DIY decorating station with bowls of colored icing, sprinkles, and edible markers so guests can customize their own treats. It’s interactive, fun, and cuts down on your prep time!
Top Tips for Perfecting Your Halloween Treat
First, don’t skip the molasses—it’s what gives these their deep, cozy flavor and beautiful golden hue. But if you only have blackstrap molasses on hand, use half the amount, as it’s much stronger. Second, chill the dough for 15–20 minutes if it feels too soft to handle; this makes shaping way easier. Third, resist the urge to overbake! These are meant to be soft and chewy, not crisp. They’ll firm up as they cool. Finally, get creative with decorations: use raisins for spider eyes, pipe white icing into ghost shapes, or dust with cocoa powder for a “dirt grave” effect. The best part of Halloween baking is making it your own—so have fun with it!
Storing and Reheating Tips
Store cooled treats in an airtight container at room temperature for up to 5 days. Layer them between sheets of parchment paper to prevent sticking. If they start to soften too much, pop them in a 300°F oven for 3–4 minutes to crisp up the edges. You can also freeze unbaked dough balls for up to 3 months—just bake straight from frozen, adding 1–2 minutes to the cooking time. Decorated treats freeze best without icing; add that fresh after thawing.
Frequently Asked Questions
Final Thoughts
Look, I’ll never claim to be the world’s most elaborate baker—but I do know what makes a recipe worth repeating. This one? It’s earned its spot on my annual Halloween menu, right next to the punch bowl and the pile of candy corn (don’t judge). It’s simple, soulful, and full of the kind of joy that only comes from sharing something homemade with people you love—whether they’re dressed as vampires, superheroes, or just wearing their comfiest PJs. So this year, when you’re scrolling through costume ideas or debating between store-bought and from-scratch, remember: the best Halloween memories aren’t just about looking the part. They’re about tasting it, too. And this treat? It tastes like autumn, laughter, and just a little bit of magic.
Easy Kids' Halloween Outfits to DIY
Ingredients
Method
- Choose a base outfit: Use an old t-shirt, hoodie, or dress in a solid color that matches your costume theme (e.g., black for a cat, white for a ghost).
- Create simple accessories: Cut felt into ear shapes and attach to a headband for animals like cats or bats. Use safety pins or hot glue (adult supervision required).
- Make a mask: Use construction paper to cut out eye holes and decorate with markers, glitter, or stickers. Attach elastic string or a popsicle stick for holding.
- Add face paint: Use washable face paint to draw whiskers, a spiderweb, or zombie details. Always do a patch test first to avoid skin irritation.
- Decorate with crepe paper: Wrap orange or black streamers around arms or a hat to create a festive pumpkin or witch look.
- Final touches: Add sunglasses for a robot or superhero vibe, or stuff socks into sleeves for a funny inflatable costume effect.

Love these DIY costume ideas—simple yet so much fun! My kids are already picking their favorites.
Love these ideas! My kids had so much fun making their own outfits—super easy and way more creative than store-bought. Definitely doing this next year!
Love these DIY costume ideas! My kids are already picking their favorites—so much easier and cheaper than store-bought.
Love these ideas! My kids will have so much fun making their own outfits—plus it’s way more personal than store-bought.
Love these ideas! My kids always go nuts for DIY costumes—last year’s ghost ones were a hit. Any easy recipes you’d recommend for the ‘delicious’ treat part?